Using AWS Amplify with Vue
AWS Amplify is a suite of tools and services from Amazon, that aims to simplify building, deploying, and managing web and mobile…

Using AWS Amplify with Vue

AWS Amplify is a suite of tools and services from Amazon, that aims to simplify building, deploying, and managing web and mobile applications.
Each of the tools is designed to work independently but they all integrate seamlessly.
- Amplify CLI — A simple command line interface to orchestrate and configure all the tools.
- Amplify Libraries — Client libraries to build common use cases such as Auth, data, and File Storage.
- Amplify Studio — A simple and intuitive visual development environment.
- Amplify UI Components — UI component libraries for React, React Native, Angular, Vue and Flutter.
- Amplify Hosting — an AWS service that provides a git-based workflow for continuous deployment & hosting.
Let’s see how everything works together with Vue by building a small application.
Prerequisites
Before we get started, we need to install a few essential tools. However, if you’re already familiar with coding and have the necessary tools set up, you can probably skip this step.
System requirements
Creating an AWS Account
If you don’t already have an AWS account, you’ll need to create one.
Install and configure the Amplify CLI
npm install -g @aws-amplify/cliamplify configure
[Step by step instructions](https://docs.amplify.aws/gen1/javascript/tools/cli/start/set-up-cli/#configure-the-amplify-cli)
Project Setup
We will need a codebase to work with. You can use your own or bootstrap a new project using vue cli:
npm init vue@3Adding amplify to the created project
amplify initThe default settings will be fine for our case. This command will create an amplify folder and a amplifyconfiguration.json file in our project.
We now need to update our main.ts file
import { Amplify } from "aws-amplify";
import amplifyconfig from "./amplifyconfiguration.json";
Amplify.configure(amplifyconfig);
Our application is now configured to use AWS backend resources, such as authentication, APIs, storage, and hosting services.
The next step is adding the library to make API calls.
amplify add apiWe can choose between REST or GraphQL. We will use GraphQL.
The default options will create a schema that we can update in the following path amplify/backend/api/your-api-name/schema.graphql
type Todo @model {
  id: ID!
  name: String!
  description: String
}
A lot of magic is going on here. This model will create a database table named Todo, the schema for CRUD (create, read, update, delete), and the GraphQL resolvers needed to make everything work together.
[Amplify GraphQL API Documentation](https://docs.amplify.aws/gen1/vue/build-a-backend/graphqlapi/data-modeling/)
All we need to do to have access to this table is to deploy the changes
amplify pushThe next step is to connect our application to the API.
We need a component to list the existing todos and another to create new ones.
<!-- TodoApp.vue -->
<script setup>
import TodoList from "./TodoList.vue";
import TodoCreate from "./TodoCreate.vue";
</script>

<template>
  <main>
    <h1>Todo App</h1>
    <TodoCreate />
    <TodoList />
  </main>
</template>
Let’s start with listing. We need to initiate the amplify client [1] that we will use to fetch the data [2] that we will save in a ref and display using a v-for loop.
The code to fetch the data (queries.listTodos) is created automatically from our model when we run amplify push during the previous step.
<!-- TodoList.vue -->
<script setup>
import \* as queries from "@/graphql/queries";
import { generateClient } from "aws-amplify/api";
const client = generateClient(); // Initiate amplify client

import { onMounted, ref } from "vue";

const todos = ref([]);

async function fetchTodos() {
  const fetchedTodos = await client.graphql({
    query: queries.listTodos,
  }); // [2] fetch data

  todos.value = fetchedTodos.data.listTodos.items;
}

onMounted(() => {
  fetchTodos();
});
</script>
<template>
  <div v-for="item in todos" :key="item.id" class="todo-list">
    <h3>{{ item.name }}</h3>
    <p>{{ item.description }}</p>
  </div>
</template>

<style scoped>
// omitted
</style>
Of course, the list is empty for now. Let’s change that by creating the TodoCreate.vue component.
<!-- TodoCreate.vue -->
<script setup>
import \* as mutations from "@/graphql/mutations";
import { generateClient } from "aws-amplify/api";
const client = generateClient();

import { ref } from "vue";
const name = ref("");
const description = ref("");

async function addTodo() {
  if (!name.value || !description.value) return;
  const todo = { name: name.value, description: description.value };
  await client.graphql({
    query: mutations.createTodo,
    variables: { input: todo },
  }); // [1] Update the database
  name.value = "";
  description.value = "";
}
</script>

<template>
  <input type="text" v-model="name" placeholder="Todo name" />
  <input type="text" v-model="description" placeholder="Todo description" />
  <button @click="addTodo">Create Todo</button>
</template>
Again we initiate the client in order to mutate the data[1].
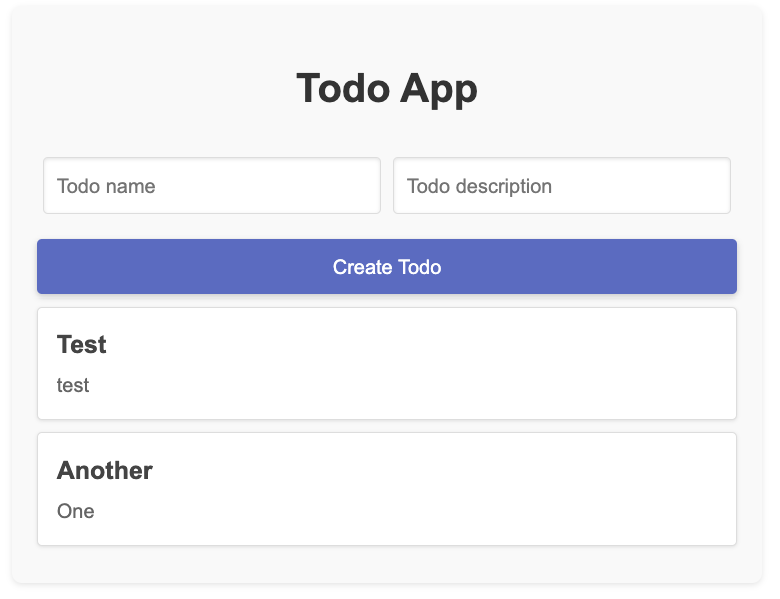
Lastly, we can keep our UI updated by subscribing to the change in the Todo model and updating our data accordingly.
<!-- TodoList.vue -->
<script setup>
// ...

client
  .graphql({
    query: subscriptions.onCreateTodo,
  })
  .subscribe({
    next: ({ data }) => {
      todos.value = [...todos.value, data.onCreateTodo];
    },
  });
</script>
Authentication
Adding authentication to our project is quite easy thanks to the built-in auth package
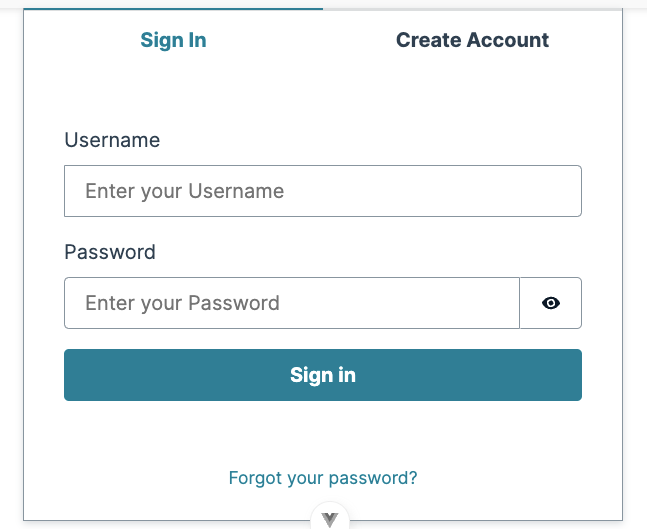
amplify add authamplify pushWe can implement a custom authentication flow if we want but Amplify UI has an Authenticator component that provides an entire authentication flow for us which is quite convenient**.**
npm install @aws-amplify/ui-vue<!-- Auth.vue -->
<script setup>
import { Authenticator } from "@aws-amplify/ui-vue";
import "@aws-amplify/ui-vue/styles.css";
</script>
<template>
<authenticator>
<template v-slot="{ user, signOut }">
<h1>Hello {{ user.username }}!</h1>
<button @click="signOut">Sign Out</button>
</template>
</authenticator>
</template>The result is a fully functional authentication flow based on the settings inside amplifyconfiguration.json
[Amplify UI docs](https://ui.docs.amplify.aws/)
Deploy
Another chore that Amplify makes a piece of cake is deployments.
amplify add hostingWe can choose between manual or automatic deployments after each code update.
To perform a manual deployment the command is
amplify publishAfter publishing, an app URL hosted on a amplifyapp.com domain will be provided.
Conclusion
In this quick introduction, setting up Amplify interestingly takes more time than actually implementing the code. However, once set up, Amplify does all the heavy lifting for some of the most tricky parts of application development.
Some examples are:
- Authentication: Easily add sign-up, sign-in, and user management.
- API: Quickly create and manage REST or GraphQL APIs.
- Storage: Store and manage user files like photos and videos.
- Hosting: Deploy and host with continuous deployment.
- Analytics: Track user behaviour and app usage.
and many more.
Amplify offers flexibility through extensive configuration options but also takes a lot of decisions for us in order to prototype an application quickly. It is a great option if you want to test an idea and the aws infrastructure behind it ensures that it will scale well if needed.