Text to Speech with Vue
One native browser feature that receives very little recognition, even though it’s available in all modern browsers, is the Web Speech API…

Text to Speech with Vue
One native browser feature that receives very little recognition, even though it’s available in all modern browsers, is the Web Speech API. We can easily convert text to speech without any additional library, which can be useful for creating interactive and accessible applications.
What We’ll Build
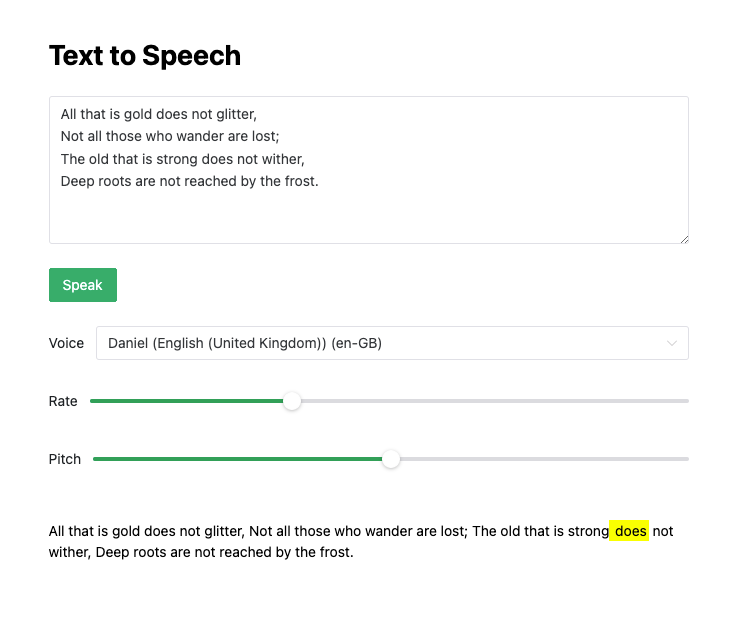
We will build a small Text-to-Speech application using Vue and the Web Speech API where users can:
- Enter text to be converted to speech.
- Select from available voices provided by the browser.
- Adjust the rate and pitch of the spoken text.
- See the currently spoken word highlighted in real-time.
The end result can be tested here and the code is available on GitHub.
You can follow along by creating a new Vue project with vite
npm create vite@latest my-vue-app — — template vue
Text to Speech Component
To get started we need a simple component with a textarea and a button to get the user’s input.
<template>
  <h1>Text to Speech</h1>
  <n-input
    v-model:value="text"
    type="textarea"
    rows="6"
    placeholder="Enter text here..."
  />
  <n-button @click="speak" type="primary">Speak</n-button>
</template>

<script setup>
import { NButton, NInput } from "naive-ui";
import { ref } from "vue";

const text = ref("");

function speak() {
  // TODO
}
</script>
I’m using
[naive-ui](https://www.naiveui.com/en-US/os-theme)components just to try something new. Feel free to use a plain HTML textarea and button if you prefer.
So far, we have implemented a basic setup. We define a reactive variable text which is bound to the value of the textarea using the v-model directive.
To convert this text into speech, we first create a speech utterance using the native browser’s [SpeechSynthesisUtterance](https://developer.mozilla.org/en-US/docs/Web/API/SpeechSynthesisUtterance) API. Once the utterance is created, we can invoke the speak() method on it to initiate the speech.
function speak() {
  const utterance = new SpeechSynthesisUtterance(text.value);
  speechSynthesis.speak(utterance);
}
That was easy. 🍰
You should be able to hear whatever is typed in the text area.
Adding Controls
Next, we’ll extend this basic functionality by adding controls for selecting a specific voice and adjusting the speaking rate and pitch.
We will create a new VoiceSettings.vue component to manage these controls. This component will be simple, but it’s a great opportunity to see how [defineModel](https://vuejs.org/guide/components/v-model) can simplify our code.
<script setup>
import { NForm, NFormItem, NSelect, NSlider } from "naive-ui";

const selectedVoice = defineModel("selectedVoice");
const rate = defineModel("rate");
const pitch = defineModel("pitch");

defineProps({
  voiceOptions: Array,
});
</script>

<template>
  <n-form label-placement="left">
    <n-form-item label="Voice">
      <n-select
        v-model:value="selectedVoice"
        :options="voiceOptions"
        placeholder="Select a voice"
      />
    </n-form-item>

    <n-form-item label="Rate">
      <n-slider v-model:value="rate" :min="0.5" :max="2" :step="0.1" />
    </n-form-item>

    <n-form-item label="Pitch">
      <n-slider v-model:value="pitch" :min="0" :max="2" :step="0.1" />
    </n-form-item>
  </n-form>
</template>
Remember the defineModel is a [shortcut](https://vuejs.org/guide/components/v-model.html#under-the-hood) of both defining a prop and an emit.
We can now use this component like so:
<voice-settings
  v-model:selectedVoice="voiceSettings.selectedVoice"
  v-model:rate="voiceSettings.rate"
  v-model:pitch="voiceSettings.pitch"
  :voice-options="voiceOptions"
/>
The full parent component will look something like the following. We’ll use an object called voiceSettings to hold all the necessary variables. First, we’ll populate the dropdown with all the available voices from the browser. Finally, we’ll apply all those settings to the utterance instance before invoking the speak function.
<script setup>
import { ref, computed, onMounted } from "vue";
import { NForm, NFormItem, NButton, NInput } from "naive-ui";
import VoiceSettings from "./VoiceSettings.vue";

const text = ref("");

const voiceOptions = ref([]);

const voiceSettings = ref({
  selectedVoice: "",
  rate: 1,
  pitch: 1,
});

const speak = () => {
  if (!text.value) {
    alert("Please enter some text.");
    return;
  }

  const utterance = new SpeechSynthesisUtterance(text.value);

  utterance.voice = window.speechSynthesis
    .getVoices()
    .find((voice) => voice.name === voiceSettings.value.selectedVoice);
  utterance.rate = voiceSettings.value.rate;
  utterance.pitch = voiceSettings.value.pitch;

  window.speechSynthesis.speak(utterance);
};

const populateVoiceList = () => {
  const voices = window.speechSynthesis.getVoices();
  if (voices.length > 0) {
    voiceOptions.value = voices.map((voice) => ({
      label: `${voice.name} (${voice.lang})`,
      value: voice.name,
    }));

    voiceSettings.value.selectedVoice = voices[0].name;
  }
};

onMounted(() => {
  populateVoiceList();
});
</script>

<template>
  <n-form label-placement="left">
    <h1>Text to Speech</h1>
    <n-form-item>
      <n-input
        v-model:value="text"
        type="textarea"
        rows="6"
        placeholder="Enter text here..."
      />
    </n-form-item>

    <n-form-item>
      <n-button @click="speak" type="primary">Speak</n-button>
    </n-form-item>

    <voice-settings
      v-model:selectedVoice="voiceSettings.selectedVoice"
      v-model:rate="voiceSettings.rate"
      v-model:pitch="voiceSettings.pitch"
      :voice-options="voiceOptions"
    />
  </n-form>
</template>
The result so far:
Highlighting Current Word
The final step is to track and highlight the current spoken word. While it may sound challenging, this time it actually is a bit tricky. The idea is to use the onboundary event of the utterance instance, which triggers when a word boundary is reached and keep a counter to track the current word.
const currentWordIndex = ref(\-1);

utterance.onboundary = (event) => {
  if (event.name === "word") {
    const charIndex = event.charIndex;
    const wordsBeforeCurrent = text.value.slice(0, charIndex).split(" ");
    currentWordIndex.value = wordsBeforeCurrent.length - 1;
  }
};
We can pass this currentWordIndex counter in a simple component that will display the text and highlight the current word using it.
<script setup>
const props = defineProps({
  text: String,
  currentWordIndex: Number,
});
</script>

<template>
  <div class="highlighted-text">
    <span
      v-for="(word, index) in text.split(' ')"
      :key="index"
      :class="{ highlighted: index === currentWordIndex }"
      class="word"
    >
      {{ word }}
    </span>
  </div>
</template>

<style scoped>
.highlighted-text {
  margin-top: 20px;
  line-height: 1.5;
  white-space: pre;
}

.word::after {
  content: " ";
}

.highlighted {
  background-color: yellow;
  transition: background-color 0.3s ease;
}
</style>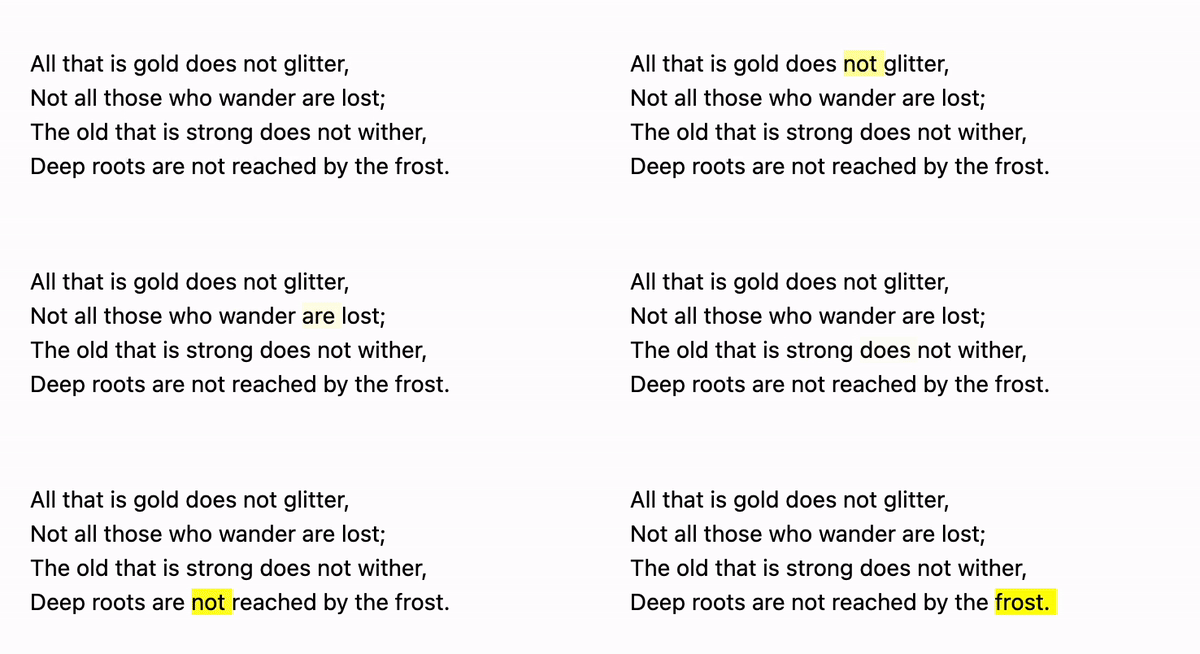
Conclusion
To sum up, this was a fun experiment! We built a simple text-to-speech application and learned how to use the Web Speech API with and Vue’s defineModel to create a clean codebase and provide an interactive experience. While there were a few tricky parts, like handling word boundaries, the result shows how browsers are progressing rapidly and provide useful APIs to create interactive and accessible applications.