Express + Mongo Application Architecture and Folder Structure
I really like express. It is extremely powerful while staying out of your way with no opinion on how your codebase will be structured. It…


Express + Mongo Application Architecture and Folder Structure
I really like express. It is extremely powerful while staying out of your way with no opinion on how your codebase will be structured. It provides all the essential tools to build a professional application but in the end, you have full responsibility for the architecture and the maintainability of the codebase.
This can be overwhelming, especially during your first interactions with the framework.
Let me demonstrate an architecture that worked for me by building a small CRUD application.
The application
We will keep things simple by building a to-do application, which is something like a hello world nowadays.
Our database schema will be the following:
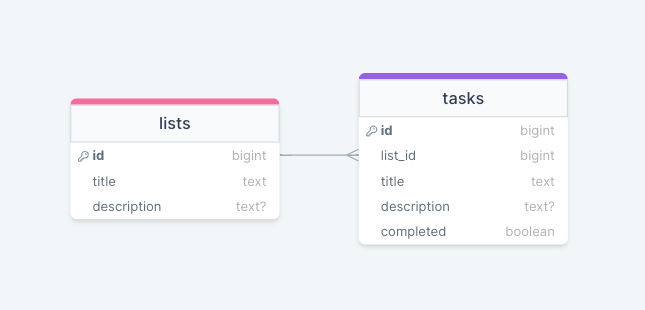
A task has an id, a title, an optional description and a flag to hold the completed status. A task can belong to a list that also has an id, a title and an optional description.
Setting up Express
You can follow [this guide](/setting-up-express-typescript-da60fd7f2538) to setup Express and Typescript or clone the repository as a starting point
git clone https://github.com/fadamakis/express-typescript-backendYou can also skip directly to the next part if you are only interested in the project architecture.
Folder Structure
We will follow a feature-based API architecture.
Each resource will be in its own feature folder.
*.route.tsAll the feature routes are declared here.*.controller.tsThe controller unwraps the request object and passes what is needed to the service. Also does error handling.*.service.tsThe service is responsible for deciding how the data will be retrieved or transformed.*.model.tsInside the model, we will define the schema of a feature using[mongoose](https://mongoosejs.com/)behind the scenes.index.tseach feature has an index file that acts as the public API
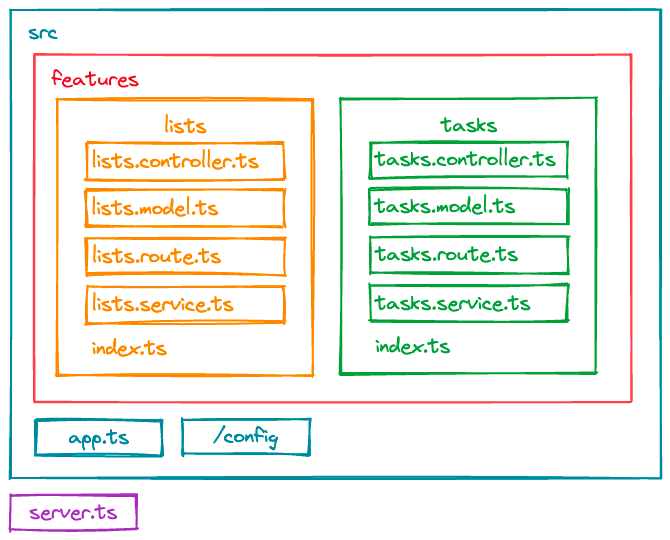
Let’s dive into each file to understand everything better.
First, we will tackle the Lists feature.
The router will be responsible for matching each URL with a corresponding controller action.
// features/lists/lists.route.ts
import express from 'express';
import \* as listsController from './lists.controller';

const router = express.Router();

router.get('/', listsController.getAll);

router.get('/:id', listsController.get);

router.post('/', listsController.create);

router.put('/:id', listsController.update);

router.delete('/:id', listsController.remove);

export default router;
The controller will be a bit more interesting but not really complicated. It will unwrap the request object if needed and pass it to the appropriate service action. It will also do some basic error handling.
// features/lists/lists.controller.ts
import { Request, Response, NextFunction } from "express";
import \* as listsService from "./lists.service";

async function getAll(req: Request, res: Response, next: NextFunction) {
    try {
      res.json(await listsService.getAll());
    } catch (err) {
      console.error(`Error while getting the lists`, err.message);
      next(err);
    }
  }

async function get(req: Request, res: Response, next: NextFunction) {
  try {
    res.json(await listsService.get(req.params.id));
  } catch (err) {
    console.error(`Error while getting the list`, err.message);
    next(err);
  }
}

async function create(req: Request, res: Response, next: NextFunction) {
  try {
    res.json(await listsService.create(req.body));
  } catch (err) {
    console.error(`Error while creating the list`, err.message);
    next(err);
  }
}

async function update(req: Request, res: Response, next: NextFunction) {
  try {
    res.json(await listsService.update(req.params.id, req.body));
  } catch (err) {
    console.error(`Error while updating the list`, err.message);
    next(err);
  }
}

async function remove(req: Request, res: Response, next: NextFunction) {
  try {
    res.json(await listsService.remove(req.params.id));
  } catch (err) {
    console.error(`Error while deleting the list`, err.message);
    next(err);
  }
}

export { getAll, get, create, update, remove };
The service will know exactly how the data has to be retrieved or manipulated. Complex logic should be abstracted here.
// features/lists/lists.service.ts
import Lists from "./Lists.model";

async function getAll() {
  return Lists.find();
}

async function get(id) {
  return Lists.findOne({ \_id: id });
}

async function create(data) {
  return new Lists(data).save();
}

async function update(id, data) {
  return Lists.findOneAndUpdate({ \_id: id }, data);
}

async function remove(id) {
  return Lists.findByIdAndDelete(id);
}

export { getAll, get, create, update, remove };
Lastly, the model will be the bridge between our application and the database. We are using mongoose to define the schema and keep everything clean.
// features/lists/lists.model.ts
import mongoose from "mongoose";

const ListsSchema = new mongoose.Schema({
  title: {
    type: String,
    required: true,
  },
  description: {
    type: String,
  },
});

export default mongoose.model("Lists", ListsSchema);
make sure to install mongoose with
npm i -D mongooose
The entry point is the index.ts file that only exports the router.
// features/lists/index.ts
export { default as lists } from "./lists.route";
Now all we have to do is to import this feature into our app.ts
// app.ts
import express, { Express, Request, Response } from "express";
import connectDB from "./config/db";

const app: Express = express();

connectDB();

import { lists } from "./features/lists";

app.use("/lists", lists);

export default app;
We just import features/lists and [pass it to express as a route](https://expressjs.com/en/guide/routing.html#express-router).
The missing piece is to connect to the database. We can do this inside a new file called config/db.ts using the [mongoose.connect](https://mongoosejs.com/docs/connections.html) command
// config/db.ts
import mongoose from "mongoose";

export default function connectDB() {
  const url = "mongodb://localhost:27017";

  try {
    mongoose.connect(url);
  } catch (err) {
    console.log(err.message);
    process.exit(1);
  }

  const dbConnection = mongoose.connection;

  dbConnection.once("open", () => {
    console.log(`Database connected: ${url}`);
  });

  dbConnection.on("error", (err) => {
    console.error(`Connection error: ${err}`);
  });
}
Lastly, the server will just initiate the application
// server.ts
import app from "./src/app";

const port = 3000;

app.listen(port, () => {
  console.log(`⚡️[server]: Server is running at http://localhost:${port}`);
});
If we now run npm run dev we should see
⚡️[server]: Server is running at http://localhost:3000
Database connected: mongodb://localhost:27017
And if we visit localhost:3000/lists we will see an empty array. Which is expected since our database is empty but it also means we successfully retrieved data using an API call.
(curl -i -X GET localhost:3000/lists would also work)
Next we will need to create a new list using a post request. But before doing that we need to install [body-parser middleware](https://expressjs.com/en/resources/middleware/body-parser.html). This is required in order to read the body of a request. We need to update our app.ts as follows
// app.ts
import express, { Express, Request, Response } from "express";
import connectDB from "./config/db";
import bodyParser from "body-parser";

const app: Express = express();

app.use(bodyParser.json());
app.use(bodyParser.urlencoded({ extended: true }));

connectDB();

import { lists } from "./features/lists";

app.use("/lists", lists);

export default app;
npm i -save-dev body-parser
Now using curl to the URL localhost:3000/lists with an object containing a title and a description should be successful.
curl -i -X POST -H 'Content\-Type: application/json' -d '{"title": "New item", "description": "description"}' localhost:3000/listsWe can confirm it by visiting localhost:3000/lists
Notice that the created list has an autogenerated id. We can use this id to retrieve a single list.
curl -i -X GET localhost:3000/lists/652aaf9753fd0014a4a14b35Or to update it using a PUT request
curl -i -X PUT -H 'Content\-Type: application/json' -d '{"title": "New item", "description": "Updated description"}' localhost:3000/lists/652aaf9753fd0014a4a14b35Lastly, deletion is done using a DELETE method
curl -i -X DELETE localhost:3000/lists/652aaf9753fd0014a4a14b35Additionally, we should test that the title being required is respected.
curl -i -X POST -H 'Content-Type: application/json' -d '{ "description": "description"}' localhost:3000/listsThe above command fails with the error
ValidationError: Lists validation failed: title: Path `title` is required.The code for the Tasks is almost identical. The only difference will be in the module declaration which looks as follows:
import mongoose from "mongoose";

const TasksSchema = new mongoose.Schema({
  title: {
    type: String,
    required: true,
  },
  description: {
    type: String,
  },
  completed: {
    type: Boolean,
    default: false,
  },
  list\_id: {
    type: mongoose.Schema.Types.ObjectId,
    ref: "Lists",
  },
});

export default mongoose.model("Tasks", TasksSchema);
Notice that the list_id is a reference to the Lists table as a foreign key.
The complete codebase is available on GitHub.
[Bonus] Documenting the API
We have built a clean and fully functional API that no one knows about. Documentation is essential and thankfully nowadays can be automated. We will use the [express-sitemap-html](https://www.npmjs.com/package/express-sitemap-html) package to create the swagger-ui for us.
Install it with npm i -save-dev express-sitemap-html and update server.ts as follows
// server.ts
import app from "./src/app";
import sitemap from "express-sitemap-html";

sitemap.swagger("TODO App - API DOCS", app);

const port = 3000;
app.listen(port, () => {
  console.log(`⚡️[server]: Server is running at http://localhost:${port}`);
});
The tool will detect and generate the route definitions.
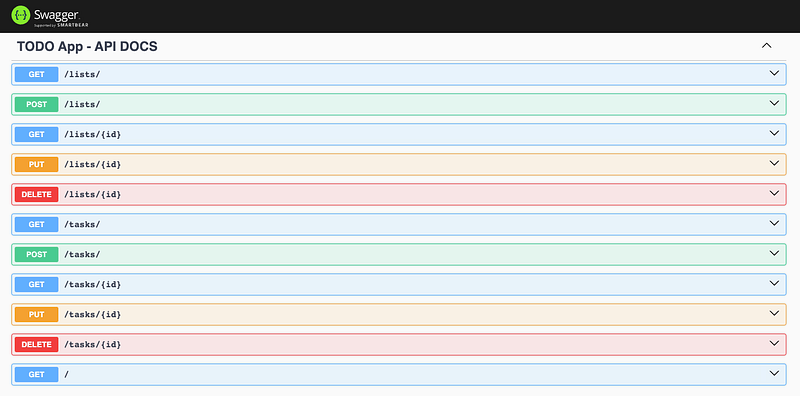
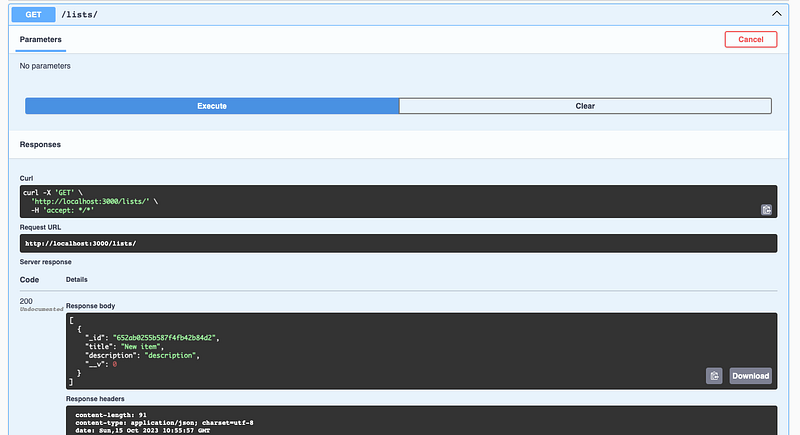
localhost:3000/api-docs/
Additionally, we can perform each API request and verify that everything works as expected.