You Might Already Know React Native
Using web technologies for building mobile apps isn’t something new. Popular tools like Cordova and Ionic have been around for years. We…


You Might Already Know React Native
Using web technologies for building mobile apps isn’t something new. Popular tools like Cordova and Ionic have been around for years. They enable us to build native apps using HTML and CSS, and run everything inside a WebView.
And that’s the problem.
We’re basically embedding a website inside our app. It works, but it never feels right. Animations and inputs are laggy, the UI feels heavy, and gestures don’t feel natural. Everything looks just a little bit off.
React Native takes a different approach.
What Makes React Native Different
In React Native, components are written using JSX, just like in a typical React project.
The syntax should look familiar:
const App = (props) => {
  return (
    <View>
      <Text>Hello there!</Text>
    </View>
  );
};
But the way this code runs is very different from the web.
In a browser-based React app, we’d use <div> and <input>. React Native doesn’t use the DOM, HTML, or CSS. It doesn’t render to a browser. Instead, it maps these components to real native UI elements.
When we write <View>, React Native compiles it to a native UIView on iOS or android.View on Android. These aren’t simulated or styled to look native. They are the same components a native developer would use.
What about the logic?
It stays the same. The UI gets compiled to native views, but the logic runs inside a small JavaScript engine that ships with the app.
This engine runs on its own thread, separate from the native UI. To talk to the native side, like updating the screen or calling device APIs, JavaScript uses a bridge.
The bridge works fine for most things, but it’s not instant. For heavy animations or quick gestures, it can slow things down. That’s where libraries like reanimated help, by letting us skip the bridge when speed matters.
Code Examples
Let’s see some everyday React Native code.
[**Styles**](https://reactnative.dev/docs/style)
React Native doesn’t use traditional CSS. Instead, styles are just plain JavaScript objects.
import { View, Text, TextInput, StyleSheet } from "react-native";

const App = () => (
  <View style={styles.container}>
    <Text>Hello there!</Text>
    <TextInput placeholder="Type something..." style={styles.input} />
  </View>
);

const styles = StyleSheet.create({
  container: {
    flex: 1,
    padding: 24,
    justifyContent: "center",
  },
  input: {
    height: 40,
    borderBottomWidth: 1,
    marginTop: 12,
  },
});

export default App;
This is the common pattern. Define the styles in one place using StyleSheet.create, and pass them to components using the style prop.
Some
[popular react styling libraries](/rip-styled-components-now-what-a8717df86e86)also work this way.
For brevity, styles will be omitted in the future.
Interactivity
Let’s make the input interactive by using state to track what the user types.
import { useState } from "react";
import { View, Text, TextInput } from "react-native";

const App = () => {
  const [text, setText] = useState("");

  return (
    <View>
      <Text>Type something below:</Text>
      <TextInput
        placeholder="Start typing..."
        value={text}
        onChangeText={setText}
      />
      <Text>You typed: {text}</Text>
    </View>
  );
};

export default App;
[Try this example on expo.dev](https://snack.expo.dev/@fadamakis/custom-components)
It works just like React on the web, state changes trigger re-renders, and your UI updates instantly.
We can also trigger actions with buttons. Here’s a small upgrade with a button that reverses the input.
import { useState } from "react";
import { View, Text, TextInput, Button } from "react-native";

const App = () => {
  const [text, setText] = useState("");
  const [reversed, setReversed] = useState("");

  const handleReverse = () => {
    setReversed(text.split("").reverse().join(""));
  };

  return (
    <View>
      <Text>Type something below:</Text>
      <TextInput
        placeholder="Start typing..."
        value={text}
        onChangeText={setText}
      />
      <Text>You typed: {text}</Text>
      <Button title="Reverse Text" onPress={handleReverse} />
      <Text>Reversed: {reversed}</Text>
    </View>
  );
};

export default App;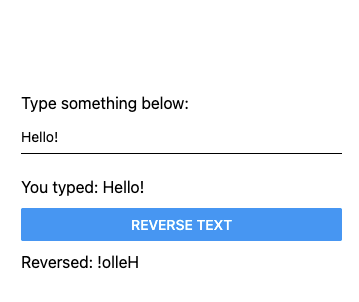
[Try this example on expo.dev](https://snack.expo.dev/@fadamakis/reversed-text)
Rendering a Scrollable List
Another common mobile pattern is displaying a list of items. React Native has a built-in component for that called SectionList, perfect for grouped lists with headers.
import { SectionList, Text, View } from "react-native";

const App = () => {
  return (
    <View>
      <SectionList
        sections={[
          { title: "D", data: ["Devin", "Dan", "Dominic"] },
          {
            title: "J",
            data: [
              "Jackson",
              "James",
              "Jillian",
              "Jimmy",
              "Joel",
              "John",
              "Julie",
            ],
          },
        ]}
        renderItem={({ item }) => <Text>{item}</Text>}
        renderSectionHeader={({ section }) => <Text>{section.title}</Text>}
        keyExtractor={(item) => item}
      />
    </View>
  );
};

export default App;SectionList takes an array of sections and handles the rest for us. Rendering, scrolling, and performance are all built in. It adds section headers automatically and works smoothly, even with long lists.
Navigation
React Native doesn’t come with built-in navigation, but the most popular choice is a library called [react-native-navigation](https://github.com/wix/react-native-navigation).
Here’s how to set up a basic two-screen app using a stack navigator.
import { NavigationContainer } from "@react-navigation/native";
import { createNativeStackNavigator } from "@react-navigation/native-stack";
import { View, Text, Button } from "react-native";

const Stack = createNativeStackNavigator();

const HomeScreen = ({ navigation }) => (
  <View>
    <Text>Home Screen</Text>
    <Button
      title="Go to Profile"
      onPress={() => navigation.navigate("Profile", { name: "Jane" })}
    />
  </View>
);

const ProfileScreen = ({ route }) => (
  <View>
    <Text>This is {route.params.name}'s profile</Text>
  </View>
);

const App = () => (
  <NavigationContainer>
    <Stack.Navigator>
      <Stack.Screen name="Home" component={HomeScreen} />
      <Stack.Screen name="Profile" component={ProfileScreen} />
    </Stack.Navigator>
  </NavigationContainer>
);

export default App;
We can navigate programmatically by calling navigation.navigate("ScreenName", params)
createNativeStackNavigator uses native navigation under the hood for better performance. React Navigation also offers other navigators like tabs and drawers, which we can mix and match to build more complex apps.
For more, check out the React Navigation docs.
Uploading Images
Another popular feature in mobile apps is image uploading. For this, we need again a third-party library. The most popular choice is [expo-image-picker](https://docs.expo.dev/versions/latest/sdk/imagepicker/). It supports selecting images from the device’s gallery or camera.
Here’s a basic example:
import { useState } from 'react';
import { View, Button, Image } from 'react-native';
import \* as ImagePicker from 'expo-image-picker';

const App = () => {
  const [image, setImage] = useState(null);

  const pickImage = async () => {
    const result = await ImagePicker.launchImageLibraryAsync({
      mediaTypes: ImagePicker.MediaTypeOptions.Images,
      quality: 1,
    });

    if (!result.canceled) {
      setImage(result.assets[0].uri);
    }
  };

  return (
    <View>
      <Button title="Pick an image" onPress={pickImage} />
      {image && <Image source={{ uri: image }} style={{ width: 200, height: 200 }} />}
    </View>
  );
};

export default App;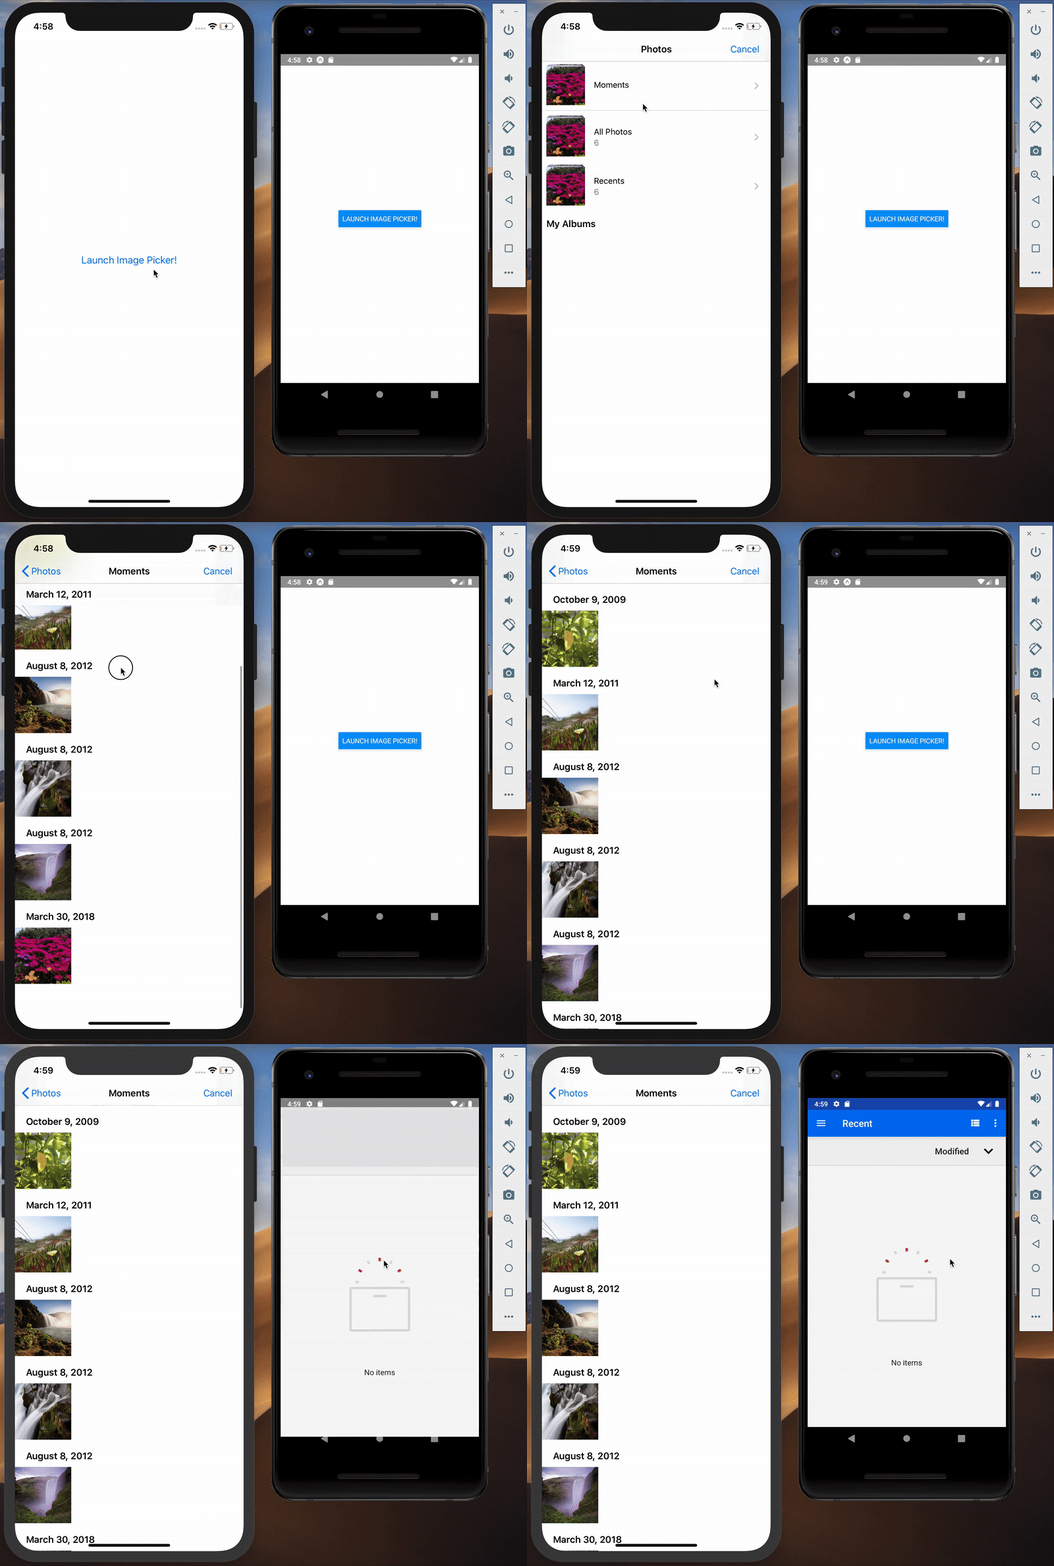
Using 3rd Party UI Libraries
Just like on the web, building everything from scratch takes time. For common UI elements like buttons, cards, modals, or lists, it’s common to use a third-party library for faster development.
There are many great options out there. A few popular ones are:
- React Native Paper
- React Native Elements
- Tamagui
[**NativeBase**](https://docs.nativebase.io/getting-started)
These libraries work just like native components, we import them and pass in props.
Here’s an example using React Native Paper:
import { useState } from "react";
import { View } from "react-native";
import {
  Provider as PaperProvider,
  Card,
  Text,
  TextInput,
  Button,
  Snackbar,
} from "react-native-paper";

const App = () => {
  const [name, setName] = useState("");
  const [visible, setVisible] = useState(false);

  const handleSubmit = () => {
    if (name.trim()) {
      setVisible(true);
    }
  };

  return (
    <PaperProvider>
      <View style={{ flex: 1, justifyContent: "center", padding: 20 }}>
        <Card>
          <Card.Title title="Welcome" />
          <Card.Content>
            <TextInput
              label="Your Name"
              value={name}
              onChangeText={setName}
              style={{ marginBottom: 16 }}
            />
            <Button mode="contained" onPress={handleSubmit}>
              Submit
            </Button>
          </Card.Content>
        </Card>

        <Snackbar
          visible={visible}
          onDismiss={() => setVisible(false)}
          duration={3000}
        >
          Hello, {name}!
        </Snackbar>
      </View>
    </PaperProvider>
  );
};

export default App;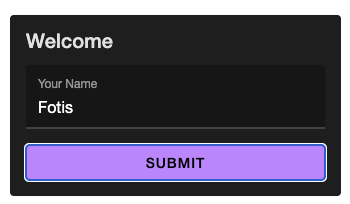
Most libraries also support themes, icons, and accessibility out of the box.
Conclusion
React and React Native look really similar, and that’s intentional. If you already know React, getting started with React Native will be easy. You’ll recognise JSX, state, props, and component patterns immediately.
Of course, there are a few new things to learn. You’ll have to get comfortable styling without CSS, using native components instead of HTML elements, and navigating without the browser’s DOM but still, you won’t start from scratch. You are a few simple concepts away from building real native mobile apps!
Get started in the official React Native docs.